View Menu
From Audacity Manual
View Menu has commands that determine the amount of detail you see in all the tracks in the project window. It also lets you show or hide Toolbars and some additional windows such as Undo History.
Zoom In
Zooms in on the horizontal axis of the audio, displaying more detail about less time. You can also use the zoom tool to zoom in on a particular part of the window.
Zoom Normal
Zooms to the default view, which displays about one inch per second.
Zoom Out
Zooms out, displaying less detail about more time.
Fit in Window
Zooms out until the entire project just fits in the window.
Fit Vertically
Adjusts the height of all the tracks until they fit in the project window.
Zoom to Selection
Zooms in until the selected audio fills the width of the screen to show the selection in more detail.
Collapse All Tracks
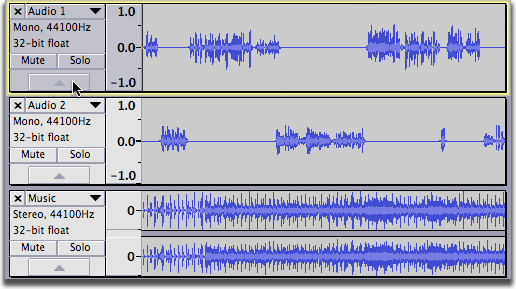
Collapses all tracks to take up the minimum amount of space. To collapse or expand an individual track, click on the triangle on the lower-left of the track label.
Expand All Tracks
Expands all tracks to their original size before the last collapse.
Show Clipping
Click this menu item to turn display of clipped samples on and off - a check mark in the item indicates that display is turned on. A clipped sample is one that is outside the volume envelope defined by +1.0 to - 1.0 (this is the vertical scale to left of the waveform when default Waveform view is enabled, as shown below). Clipped samples are bad, as they cause distortion and lost audio information - avoid them where possible, for example by setting the recording level correctly. Turn "Show Clipping" off if it behaves sluggishly on slower machines.
By choosing , clipping can also be shown diagrammatically in a Label Track so that screen-readers can access the information.
History...
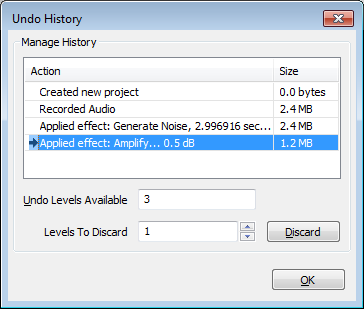
Brings up the History window. It shows all the actions you have performed in the current project, including importing. The right-hand column shows the amount of hard disk space your operations used. You can jump back and forth between editing steps quite easily by clicking on the entries in the window or using <up> or <down> arrow keys to select an entry:
See Undo, Redo and History for details on using the Undo History window.
Karaoke...
The Karaoke... command is enabled whenever you have at least one label track. If you have multiple label tracks, it uses only the first one.
The command brings up the Karaoke window, which displays the labels in a "bouncing ball" scrolling display. You can select a playback start point in the main tracks window and the Karaoke window will start from there.
Audacity automatically puts a space between words, so you don't need to put them in your labels.
You may want to split up lyrics such that the ball bounces per syllable rather than just for the whole word. To do this, create a label for each syllable, and end each with a hyphen ("-"), except the last syllable. For example, "Aud-" "a-" "ci-" "ty". The hyphen tells Audacity to not put a space between the syllables, as it does between words. Note there may still be space between the syllables, depending on how far apart they are in the timeline and the size of the Karaoke window.
Mixer Board...
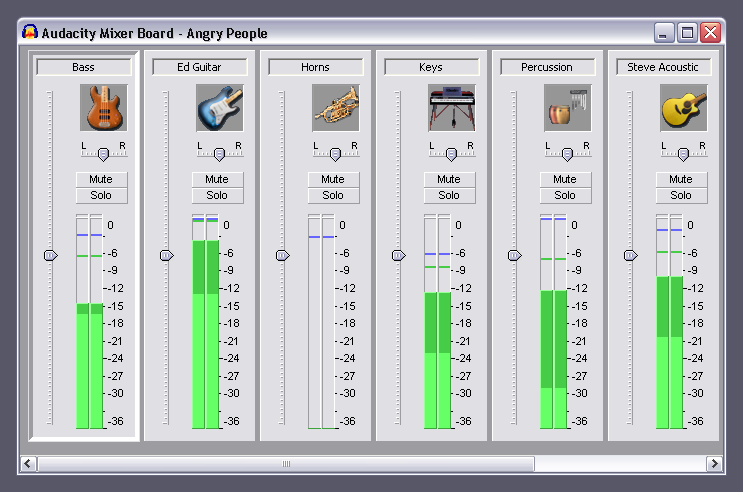
Mixer Board is an alternative view to the audio tracks in the main tracks window, and is analogous to a hardware mixer board. Each audio track is displayed in a Track Strip. Each Track Strip has its own pair of meters, gain slider, pan slider, and mute/solo buttons, echoing that track's controls in the Track Control Panel in the main tracks window. The Mixer Board... command is enabled whenever there's an audio track - it can even be brought up during playback.
All Mixer Board controls update the controls in their respective Track Control Panel and vice-versa. For example, muting a track in the Mixer Board also mutes that track in the main tracks window.
As in the Track Control Panels, double-click in either Mixer Board slider to enter an exact gain or pan value in a text box.
The meters are post-fade, like Meter Toolbar, such that they show the levels as modified by the track's gain/pan sliders and mute/solo buttons. Mono tracks show in both track meters, as in the Meter Toolbar.
You can select a Mixer Board track by clicking its Track Strip, either on the image near the top or between the sliders and buttons. Deselect all tracks by clicking in the dark gray between track strips.
By default, the image at the top is the Audacity logo, but if you name the track in the Track Control Panel with an instrument name or abbreviation thereof, Mixer Board automatically shows an appropriate image as listed below. A track name that contains any of the keywords (in bold) will display the image that is associated with those keywords. If the track name contains keywords for more than one instrument, the Mixer Board will display the best match.
|
|
|
Examples:
- "electric b" displays an standard electric guitar ("b" is not a keyword), but "electric bs" displays an electric bass guitar ("bs" is a keyword).
- "electric gtr" will display an electric guitar. Although these keywords are also in the bass guitar list, in the absence of the keywords bass or bs, the Mixer Board sees the (standard) electric guitar as a better match.
- "drums" will display a drum kit as it is a keyword. "drum" will also display a drum kit as it contains dr which is a keyword.
Toolbars
These commands hide or show the eight Audacity Toolbars:
Device, Edit, Meter, Mixer, Selection, Tools, Transcription and Transport
"Reset Toolbars" at the bottom of this group positions all toolbars as they were when Audacity was first installed.


